Mushrooms are not only a delicious addition to many dishes but also pack a powerful nutritional punch. Growing your own mushrooms can be a rewarding and cost-effective way to enjoy fresh fungi right from your home. In this comprehensive guide, we will explore everything you need to know about growing mushrooms, focusing particularly on oyster mushrooms and how to utilize mushroom growing kits effectively.
Why Grow Your Own Mushrooms?
By cultivating your own mushrooms, you can ensure that you pick them at their peak of perfection. This can be a great way to save money compared to purchasing mushrooms from the grocery store. Furthermore, mushrooms are renowned for their health benefits, particularly for supporting the immune system and providing antioxidants that help in combating various diseases.
Getting Started with Mushroom Growing Kits
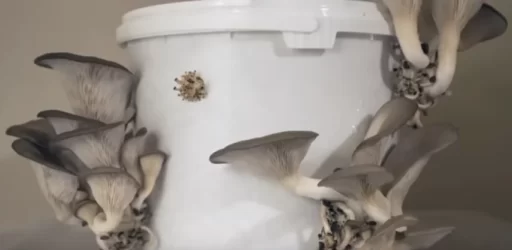
Mushroom growing kits are perfect for beginners due to their simplicity and ease of use. One of the most popular varieties to grow at home is the oyster mushroom. These mushrooms are not only delicious but also grow quickly; you can expect to go from preparation to harvest in as little as two weeks.
Types of Growing Mediums
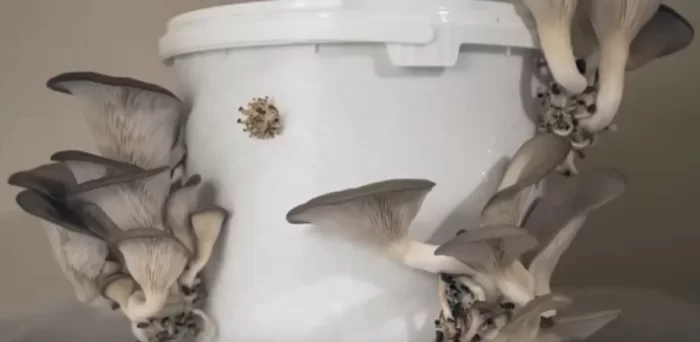
Mushroom growing kits typically use different types of growing mediums. For instance, oyster mushrooms can thrive in various substrates such as straw and coffee grounds. This versatility makes them accessible for home cultivation.
- Straw-based Kits: These kits usually involve straw pellets that are rehydrated before introducing the mushroom spawn.
- Coffee Grounds Kits: These innovative kits utilize coffee grounds mixed with straw, turning waste into a sustainable and nutritious growing medium.
Preparing Your Kit
Oyster Mushroom Kit
- Materials Needed: For an oyster mushroom kit, you will need a 10-liter (or 2.5 US gallon) pot, straw pellets, and mushroom spawn (usually on barley grains).
- Sterilization: Begin by sterilizing your pot with a diluted household bleach solution. This helps eliminate any germs that could harm your mushrooms.
- Creating Drainage Holes: Cut small holes (approximately 1.5 centimeters or half an inch) in the sides of the pot using sharp scissors. This allows the mushrooms to grow through the pot.
- Bottom Layer: Place a piece of cardboard at the bottom to prevent the straw from escaping through the drainage holes.
- Mixing the Medium: Break up the spawn grains and mix them with the straw pellets in the pot. Ensure that your hands are clean to avoid introducing contaminants.
- Rehydration: Slowly trickle about 4.5 liters (roughly a gallon) of water into the pot, allowing the straw to absorb it.
- Covering the Pot: Create a lid using cardboard wrapped in cling film to retain moisture. Insert the straw into the drainage holes to create a humid environment.
- Providing Ideal Conditions: Store the pot at room temperature, away from direct heat sources. Mist the holes a couple of times a day to maintain moisture.
Coffee Grounds Mushroom Kit
- Remove the Cover: Begin by removing the perforated front of the coffee grounds kit to access the growing medium.
- Cutting the Bag: Make an X-shaped cut in the bag containing the growing medium.
- Soaking the Bag: Submerge the bag in water overnight, ensuring it is weighted down to prevent floating.
- Observe Growth: After a few days, you will start to see growth. Coffee ground kits tend to be quick growers, often doubling in size daily.
Harvesting Your Mushrooms
Once your mushrooms have grown to a suitable size, it’s time to harvest them.
- When to Harvest: For oyster mushrooms, the best time to harvest is just before the caps flatten out completely. This prevents them from releasing spores, which can create a mess.
- How to Harvest: Gently twist the entire cluster free from the substrate. If there are leftover bits, trim them away with a sharp knife.
- Multiple Harvests: After the first harvest, you can continue misting and expect new mushrooms to sprout from the same kit every few weeks, potentially yielding several harvests over a couple of months.
Additional Tips for Successful Mushroom Cultivation
- Temperature Control: Maintain an ambient temperature ideal for mushroom growth, typically between 20-24°C (68-75°F).
- Humidity: Keeping the environment humid is critical; mist the mushrooms regularly.
- Light Requirements: Mushrooms generally prefer low light, so avoid direct sunlight on your growing kit.
- Choosing Quality Kits: Always opt for approved mushroom kits from reputable suppliers to ensure safety and maximize your chances of a successful crop.
Conclusion
Growing mushrooms at home can be an incredibly fulfilling experience that yields delicious and nutritious results. Whether you choose to grow oyster mushrooms in a straw-based kit or use coffee grounds, the process is straightforward and rewarding. With just a little patience and care, you can enjoy fresh mushrooms right from your kitchen.
Frequently Asked Questions
- How long does it take to grow mushrooms at home?
- Depending on the type of mushroom and conditions, it can take anywhere from two weeks to several weeks to see significant growth.
- What is the best substrate for growing mushrooms?
- Oyster mushrooms grow well in straw, coffee grounds, and a variety of other organic materials.
- Can mushrooms be grown indoors?
- Yes, many mushroom varieties, including oyster mushrooms, thrive indoors under controlled conditions.
- Do I need special equipment to grow mushrooms?
- Basic equipment like pots, a spray bottle for misting, and a sterile workspace are sufficient for home mushroom cultivation.
- How can I tell if my mushrooms are ready to harvest?
- Harvest them just before the caps flatten out completely to prevent spore release.
- What are the health benefits of mushrooms?
- Mushrooms are rich in nutrients and can support immune function and overall health.
- Can I reuse my mushroom growing kit after the first harvest?
- Yes, many kits can produce multiple harvests if properly cared for and rehydrated.

