
Growing mushrooms at home is not only fun but also rewarding. Mushrooms are a versatile ingredient in many dishes, and growing your own can save you money while providing fresh, organic mushrooms right from your kitchen. If you’ve ever wanted to try your hand at mushroom cultivation, you’re in the right place. This guide will walk you through a simple, cost-effective way to grow mushrooms at home, primarily focusing on oyster mushrooms, one of the easiest varieties to cultivate.
Materials You Will Need
To grow mushrooms at home, you’ll need the following:
- Plastic Containers: Use 1-gallon or 5-liter plastic containers with lids. These can be found at a low cost or for free from restaurants.
- Straw: Straw is the substrate that mushrooms will grow on. It’s inexpensive and readily available at pet stores.
- Mushroom Spawn: For this guide, we’ll use grain spawn, which is easy to handle and works well with straw.
- Surgical Tape: This breathable tape helps to keep contaminants out while maintaining humidity levels.
- A Netting Sack or Pillowcase: Used to hold the straw during the pasteurization process.
Step 1: Preparing the Buckets
The first step in the mushroom-growing process is preparing the containers where your mushrooms will grow. Follow these instructions to get started:
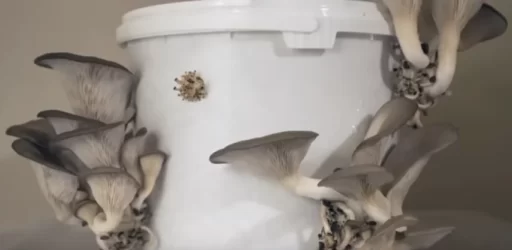
- Drill Holes: Using a drill, make holes around the walls of your bucket. This allows for airflow, which is essential for mushroom growth. Additionally, drill holes at the bottom for drainage to prevent water from pooling.
- Smooth the Edges: After drilling, remove any rough plastic edges and sand them down to avoid injury or damage to the mycelium.
- Reusable Buckets: While special mushroom-growing bags are available, using plastic buckets saves money and can be reused multiple times.
For larger buckets (e.g., 5-gallon containers), drill about 20 holes, spaced approximately 6 inches (15 cm) apart. Ensure there are multiple rows of holes for adequate airflow.
Step 2: Preparing the Straw
Straw acts as the growing medium or substrate for the mushrooms. Here’s how to prepare it:
- Chop the Straw: If your straw isn’t pre-chopped, cut it into smaller pieces. This helps the mycelium (the root-like structure of the mushrooms) to colonize the straw faster.
- Pasteurization: To kill off harmful microorganisms, place the straw in a bucket of hot water at a temperature between 140-175°F (60-80°C). Use a netting sack or an old pillowcase to hold the straw during this process.
- Soak for One Hour: Submerge the straw fully and leave it to soak for about an hour. This ensures that the pasteurization process is effective, killing harmful fungi while retaining beneficial microorganisms.

After one hour, remove the straw and let it drain for about 30 minutes. It should be cool to the touch and free from excess water.
Step 3: Inoculating the Straw with Mushroom Spawn
Once your straw is prepared, it’s time to inoculate it with the mushroom spawn. This is where the magic happens.
- Sterilize Everything: Ensure all tools, surfaces, and your hands are clean to prevent contamination. Use isopropyl alcohol or sterilizing powder to clean your containers, lids, and workspace.
- Layer the Straw and Spawn: Begin by placing a layer of straw at the bottom of your container. Sprinkle a layer of grain spawn over the straw. Repeat this layering process, ensuring that the spawn is evenly distributed throughout the container.
- Spawn to Straw Ratio: Aim for a ratio of about 5-10% mushroom spawn to 90-95% straw by volume. This ensures that the mushrooms will colonize quickly and outgrow any potential contaminants.
Step 4: Sealing and Waiting
Once the containers are filled with the straw and spawn mixture, seal them and wait for the mycelium to colonize the straw fully.
- Seal the Holes with Surgical Tape: Cover each hole with breathable surgical tape. This keeps contaminants out while allowing air to flow, which is essential for mushroom growth.
- Incubate the Buckets: Keep the containers at room temperature, away from direct sunlight and extreme temperature fluctuations. Over the next two weeks, the mycelium will spread throughout the straw, turning it white as it fully colonizes the substrate.
Step 5: Growing and Harvesting Mushrooms
Once your straw is fully colonized, the next step is to encourage mushroom growth.
- Remove the Tape: After about two weeks, remove the tape from the holes. You should see the white mycelium right up to the edges of the holes.
- Maintain Humidity: Mushrooms thrive in humid environments. Mist the inside of the container twice a day to maintain a moist environment. Ensure they receive some indirect light, but avoid direct sunlight.
- Watch for Pinning: After a few days, you’ll notice small pin-sized mushrooms starting to grow. These are the early fruiting bodies, and they will rapidly increase in size.
- Harvest: Harvest the mushrooms when their caps are still slightly curled. Avoid waiting until they flatten out, as the mushrooms will begin releasing spores.
Step 6: Reusing Your Buckets
Once you’ve harvested your mushrooms, don’t throw away the substrate. You may get a second or even third flush of mushrooms with continued care and misting. Once the substrate is spent, you can use the mycelium-laden straw to inoculate a new batch of pasteurized straw and repeat the process.
Frequently Asked Questions
- How long does it take to grow mushrooms at home? Typically, it takes about two to three weeks for the mycelium to fully colonize the substrate and another week or so for the mushrooms to start growing.
- Can I reuse the same mushroom-growing bucket? Yes, plastic buckets can be reused multiple times. Simply clean them thoroughly between uses to prevent contamination.
- What type of mushrooms are best for beginners? Oyster mushrooms are ideal for beginners because they are easy to grow and require minimal maintenance.
- Do I need special equipment to grow mushrooms at home? No, most of the materials needed, like plastic buckets and straw, can be sourced locally at a low cost.
- How do I keep mushrooms humid enough for growth? Mist your mushrooms twice a day to maintain high humidity levels. You can also place them in a naturally humid environment, like near a window that doesn’t receive direct sunlight.
- How many mushrooms can I expect from one batch? Yields vary depending on conditions, but you can typically expect multiple flushes of mushrooms from one batch of straw.
- Can I grow mushrooms without using straw? Yes, other substrates like sawdust or coffee grounds can also be used for growing mushrooms, but straw is the most common for beginners.