
Growing cherry seeds at home may seem challenging, but with the right technique, you can cultivate them in simple steps. Cherry is one of the most delicious and popular fruits, but its high price in the market might deter many from enjoying it regularly. Fortunately, growing cherry seeds is an inexpensive and rewarding process. Let’s dive into the steps and methods for planting cherries at home.
Why Grow Cherries at Home?
Cherries are among the most delightful fruits you can enjoy, but their cost often makes them a luxury. By planting cherries at home, you can enjoy this fruit without the high price tag. Additionally, growing your food at home is satisfying, especially when you see the fruits of your labor thriving.
Preparing the Seeds
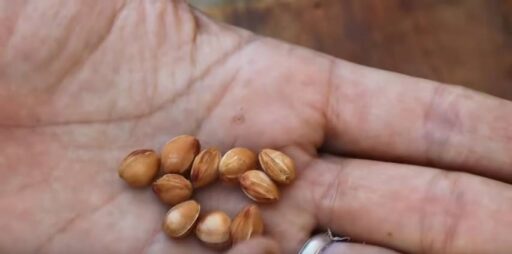
The first step is to extract the seeds from the cherries. After removing the seeds from the fruit, break open the hard outer shell carefully. You can use a hammer or a similar tool, but be gentle to avoid damaging the seeds inside. Once you’ve cracked open the shell, you’ll have access to the seed itself.
After obtaining the seeds, wash them thoroughly. Now, you have two options for planting: one involves using plastic cups, and the other method involves paper towels. Let’s explore both.
Method 1: Planting in Plastic Cups
This method is straightforward and convenient. Begin by filling plastic cups with any type of soil available to you. Ensure the soil is moist but not waterlogged. After adding the soil, plant the cherry seeds directly into it. Ensure that the pointed end of the seed is facing upwards, as this will help the roots develop correctly.
Once planted, water the soil lightly but avoid over-watering, as cherry seeds don’t require frequent watering. After planting the seeds in the soil, place the cups in your refrigerator. Yes, the refrigerator! Cherry seeds thrive in a cold environment and need a low temperature to germinate.

Place the cups in the refrigerator for a few weeks, and remember to check the moisture level in the soil regularly. If the water drains into a plate, discard any excess to prevent the drainage holes from becoming clogged.
Method 2: Using Paper Towels
This method is even simpler. Place the seeds in a moist paper towel or fabric. Then, put the towel in a container or plastic bag and store it in the refrigerator. Keep an eye on the seeds to ensure they remain moist. In a few weeks, you’ll notice that the seeds will begin to sprout.
Monitoring the Growth
After the seeds have spent some time in the refrigerator and have started to germinate, you can transfer them to a larger pot or directly into the garden. It’s essential to choose a shaded spot, avoiding direct sunlight as young cherry plants are sensitive to heat. Over time, the cherry tree will grow and eventually adapt to its environment, even in warmer climates.
Caring for the Cherry Seedlings
Cherry trees grow best in cool environments but can adapt to warmer climates if they start as seeds in those conditions. Once your cherry trees have grown for about a month, you can transfer them to a permanent location in your garden or keep them in larger pots.
Continue to water the plants lightly and consistently, ensuring that the soil surface doesn’t dry out completely. Keep the trees away from direct sunlight and place them in an area with good air circulation and indirect light. After about 35 days, you should start seeing the fruits of your labor—tiny cherry plants growing in your home garden.
Conclusion
Growing cherry seeds at home is an easy and rewarding project. It not only saves you money but also provides you with fresh, homegrown cherries. With the right care, patience, and attention, you can enjoy the beauty and flavor of cherries without any significant investment. Whether you have a large garden or a small space indoors, planting cherries can be a delightful experience.